Hello SpringBoot
Features
- Create stand-alone Spring applications 创建独立的 Spring 应用
- Embed Tomcat, Jetty or Undertow directly (no need to deploy WAR files) 内嵌 Web 服务器
- Provide opinionated ‘starter’ dependencies to simplify your build configuration 提供
starter来简化配置 - Automatically configure Spring and 3rd party libraries whenever possible 自动配置第三方继承
- Provide production-ready features such as metrics, health checks, and externalized configuration 提供生产级别的监控、健康检查和外部配置
- Absolutely no code generation and no requirement for XML configuration 无代码生成与 XML 配置
- 官方文档-2.7.8
starter
<!-- 固定写法 -->
<parent>
    <groupId>org.springframework.boot</groupId>
    <artifactId>spring-boot-starter-parent</artifactId>
    <version>2.7.8</version>
</parent>
<dependencies>
    <!-- starter:场景启动器,根据不同的场景,导入所需的依赖 -->
    <dependency>
        <groupId>org.springframework.boot</groupId>
        <artifactId>spring-boot-starter-web</artifactId>
    </dependency>

    <dependency>
        <groupId>org.springframework.boot</groupId>
        <artifactId>spring-boot-starter-test</artifactId>
        <scope>test</scope>
    </dependency>

    <dependency>
        <groupId>org.springframework.boot</groupId>
        <artifactId>spring-boot-devtools</artifactId>
        <optional>true</optional>
    </dependency>
</dependencies>

<build>
    <plugins>
        <!-- 该插件用于将应用打成jar包,简化部署,可以用 java -jar 直接运行在内置的 servelet 容器 -->
        <plugin>
            <groupId>org.springframework.boot</groupId>
            <artifactId>spring-boot-maven-plugin</artifactId>
            <!-- 排除掉自动配置提示的插件,新版不用写 -->
            <configuration>
                <excludes>
                    <exclude>
                        <groupId>org.springframework.boot</groupId>
                        <artifactId>spring-boot-configuration-processor</artifactId>
                    </exclude>
                </excludes>
            </configuration>
        </plugin>
    </plugins>
</build>
spring-boot-starter-* 称为场景启动器,所有场景启动器都会依赖 spring-boot-starter-parent。
spring-boot-starter-parent 的 parent 为 spring-boot-dependencies,这是 springboot 真正管理依赖的地方。
<groupId>org.springframework.boot</groupId>
<artifactId>spring-boot-dependencies</artifactId>
<version>2.7.8</version>
<packaging>pom</packaging>

<properties>
  <activemq.version>5.16.5</activemq.version>
  ......
<properties>

<dependencyManagement>
    <!-- 约定了大量的依赖、版本 -->
    <dependencies>
      <dependency>
        <groupId>org.apache.activemq</groupId>
        <artifactId>activemq-amqp</artifactId>
        <version>${activemq.version}</version>
      </dependency>
      ......
    </dependencies>
</dependencyManagement>
如果想要自定义某个被 SpringBoot 管理的依赖的版本,直接在自己的 pom 中重写 spring-boot-dependencies 中的属性即可 (Maven 子 pom 重写父 pom)。
主启动类
@SpringBootApplication
public class HelloSpringBootApplication {
    public static void main(String[] args) {
        // 会返回一个 ApplicationContext
        ConfigurableApplicationContext ac = SpringApplication.run(HelloSpringBootApplication.class, args);
        System.out.println("BeanDefinitionCount: " + ac.getBeanDefinitionCount());;
    }
}
@SpringBootApplication 说明该类是此项目的主启动类/主配置类。SpringBoot 默认会扫描主启动类所在包及其子包。
// ...
@SpringBootConfiguration
@EnableAutoConfiguration
@ComponentScan(
    excludeFilters = {@Filter(
    type = FilterType.CUSTOM,
    classes = {TypeExcludeFilter.class}
), @Filter(
    type = FilterType.CUSTOM,
    classes = {AutoConfigurationExcludeFilter.class}
)}
)
public @interface SpringBootApplication {...}
几个注解
@SpringBootApplication是一个组合注解,相当于三合一:@SpringBootConfiguration相当于 @Configuration,表示当前类是一个配置类;@ComponentScan,扫描指定包路径下的类注册为 bean;@EnableAutoConfiguration,开启自动配置;
@Configuration放类头上,声明该类是一个配置类;
proxyBeanMethods属性默认为 true,表示生成该配置类的代理对象注入到 IoC 容器,当调用配置类中的 @Bean 方法时,会先尝试从容器中寻找并返回。如果设为 false,则每次调用都相当于调用普通方法,会返回新的对象。@Import:向容器中注入 bean,可以加在任意组件的头上;- 传递全类名可导入普通组件,id 默认为全类名;
- 还可以传递
ImportSelector接口的实现类,实现selectImports方法,返回一个 String 数组,包含需要加载进容器的全类名; - 还可以传递
ImportBeanDefinitionRegistrar接口的实现类,实现registerBeanDefinitions方法手动定义并注入 bean,和前两种相比,可以指定 bean 的 id;
@Condition:放在类或方法上,根据条件判断是否加载配置类或 bean;@PropertySourse("classpath:xxx")声明加载指定配置文件。@ImportResource(location = {"classpath: bean.xml"})放在配置类头上,导入编写的 Spring 配置文件;@ConfigurationProperties(prefix="xxx")加在 Bean 上,将配置文件中的配置项绑定到 Bean 的属性上 (Bean 需要被显式注册到容器);支持松散绑定,即可以识别驼峰或短斜杠,不支持 SpEL 表达式,支持 JSR-303 校验和复杂类型。注意只使用该注解不会加载 bean 到容器中,要配合 @Component、@EnableConfigurationProperties 使用;@EnableConfigurationProperties,放在配置类上,传递全类名,绑定配置项到该类的实例并注册到容器;@Value("xx")加在 Bean 的属性上,不支持松散绑定,支持 SpEL 表达式,不支持 JSR-303 校验和复杂类型。
自动配置
可以想到使用 @ComponentScan + @Configuration 实现自动配置,但是必须知道包路径才能找到配置类,所以引出了下面的 @Import 注解和类似 Java SPI 的类加载机制。
自动配置的入口是 @EnableAutoConfiguration 注解,结合 @Import、@Condition、@ConfigurationProperties 等来实现自动注册与配置。
@EnableAutoConfiguration 由 @AutoConfigurationPackage 和 @Import 组成,如下。
@AutoConfigurationPackage
@Import({AutoConfigurationImportSelector.class})
public @interface EnableAutoConfiguration {...}@AutoConfigurationPackage里面使用了 @Import 向容器中批量注册主启动类所在包下的所有组件,如下两段代码所示。
@Import({AutoConfigurationPackages.Registrar.class})
public @interface AutoConfigurationPackage {...}
// AutoConfigurationPackages.Registrar 实现的方法
public void registerBeanDefinitions(AnnotationMetadata metadata, BeanDefinitionRegistry registry) {
AutoConfigurationPackages.register(registry, (String[])(new PackageImports(metadata)).getPackageNames().toArray(new String[0]));
}@Import(AutoConfigurationImportSelector.class)向容器中批量注册所有自动配置类。扫描类路径下所有的META-INF/spring.factories得到需要加载的自动配置类的全类名。每个自动配置类根据@Condition的条件按需生效,向容器中配置并注册组件。
spring.factories 文件写法:
# Auto Configure
org.springframework.boot.autoconfigure.EnableAutoConfiguration=\
com.example.MyAutoConfiguration,\
com.example.AnotherAutoConfiguration

# SpringApplicationRunListener
org.springframework.boot.SpringApplicationRunListener=\
com.example.MySpringApplicationRunListener

# ...
自动配置期间,自动配置类 xxxAutoConfiguration 会从对应的 xxxProperties 获取配置项,例如:
// 配置项绑定到配置Bean,不会自动注入,
// 除非配合使用 @EnableConfigurationProperties
// 或通过声明 @Component、@Bean 注入
@ConfigurationProperties("spring.web")
public class WebProperties {...}

// 将配置Bean关联到自动配置类,自动注入 WebProperties
@EnableConfigurationProperties(WebProperties.class)
public static class EnableWebMvcConfiguration {...}
自定义 starter
目的是结合自动配置,在自动配置类中,结合配置项与条件判断等,给容器中注入一些组件。
配置文件
查看都有哪些配置项:Common Application Properties (spring.io)
YAML 写法
- 字符串不用加引号;
- 加单引号:将会转义特殊字符,如
\n会原样输出。 - 加双引号:不会转义特殊字符,如
\n会换行。
- 加单引号:将会转义特殊字符,如
- 驼峰和短横杠链接效果一样;
对象/Map 写法:
# 写法一
person:
  firstName: xx
  lastName: xx
# 写法二
person: {firstName: xx, lastName: xx}
数组写法:
# 写法一
person:
  - zhangsan
  - lisi
  - wangwu
# 写法二
person: [zhangsan,lisi,wangwu]
占位符与默认值:(也适用于 properties)
person:
  first-name: zhang
  last-name: san
  id: ${random.uuid}
People:
  name: ${person.first-name:xxx}_${person.last-name}
# 获取不到值,就原样输出表达式。
# 可以使用一些特殊的表达式,如 ${random.uuid}。
# 其中${person.first-name:xxx} 冒号后面(不带空格)指定的就是默认值。
多配置文件
SpringBoot 默认会加载 application-{xxx}.yml/properties 配置文件。
在默认配置文件中添加 spring.profiles.active=xxx 指定加载哪个配置文件。默认配置文件与 active 指定的配置文件同时生效,当两者中的配置项冲突时,active 指定的配置文件生效。
除了创建多个文件,也可以使用 yml 分块来实现多配置文件:
# 使用三个短横杆分块
server:				    # 第一块相当于默认配置文件
  port: 8081
spring:
  profiles:
    active: prod	# 声明激活哪一个块
‐‐‐
server:
  port: 8082
spring:
  profiles: dev		# 声明该块的名字
‐‐‐
server:
  port: 8083
spring:
  profiles: prod
使用命令行参数指定:
java -jar xxx.jar --spring.profile.active=xxx优先级
规则:配置文件的位置影响其加载顺序,配置项“冲突”时后加载的生效。常用的记录如下:
1. classpath:/
2. classpath:/config
3. jar 包所在目录
4. jar 包所在目录的 config 目录
5. jar 包所在目录的 config 目录的一级子目录
--上面是配置文件的位置--
6. OS environment variables
7. Java System properties
8. Command line arguments
日志模块
Note
常见日志接口:JCL、SLF4J、JBoss-Logging
常见日志实现:Log4J、Log4J2、JUL、Logback
SpringBoot 默认使用:SLF4J + Logback
统一日志框架
项目中的某些组件可能依赖于其他日志框架,我们想要全部转换为 SLF4J + Logback,步骤如下:
- 排除其他日志框架;
- 使用中间包替换被排除的日志框架;
中间包本质是一个适配层,包名、方法签名和被替换的原日志包一模一样,只不过方法实现中调用了 SLF4J 的 API。 - 导入 slf4j 实现;
spring-boot-starter-logging 中已经帮我们导入了中间包、SLF4J 和 Logback,我们需要做的只是:当我们引入了一个依赖其他日志框架的组件时,手动在 pom 文件中,将该日志框架排除掉即可,例如:
<!-- 排除 spring 依赖的 commons-logging -->
<dependency>
    <groupId>org.springframework</groupId>
    <artifactId>spring‐core</artifactId>
    <exclusions>
        <exclusion>
            <groupId>commons‐logging</groupId>
            <artifactId>commons‐logging</artifactId>
        </exclusion>
    </exclusions>
</dependency>
使用与配置
使用:
import org.slf4j.Logger;
import org.slf4j.LoggerFactory;
public class HelloLog {
  public static void main(String[] args) {
    // 获取日志记录器 logger
    Logger logger = LoggerFactory.getLogger(HelloLog.class);

    // 记录日志
    logger.trace("Hello World");
    logger.debug("Hello World");
    // 默认级别
    logger.info("Hello World");
    logger.warn("Hello World");
    logger.error("Hello World");
  }
}
配置:
# 指定某个包下的日志级别
# 没有配置的还是使用默认级别 info
logging.level.site.henrykang.xxx=trace

# 指定日志输出的文件名,默认只会输出到控制台
# 也可以指定路径
logging.file=mylog.log

# 指定日志存放的目录,文件名使用默认的 spring.log
# 该配置和 logging.file 冲突,二选一使用即可
logging.path=./log

# 指定控制台输出格式
logging.pattern.console=%d{yyyy/MM/dd-HH:mm:ss} [%thread] %-5level %logger- %msg%n
# 指定文件记录格式
logging.pattern.file=%d{yyyy/MM/dd-HH:mm} [%thread] %-5level %logger- %msg%n

# 日志输出格式控制:
# %d 			日期时间
# %thread		表示线程名
# %‐5level		级别从左显示5个字符宽度
# %logger{50} 	表示logger名字最长50个字符,否则按照句点分割
# %msg			日志消息
# %n			换行符
# %d{yyyy‐MM‐dd HH:mm:ss.SSS} [%thread] %‐5level %logger{50} ‐ %msg%n
Web 模块
SpringMVC 配置
自动配置类:WebMvcAutoConfiguration
SpringBoot 对 SpringMVC 进行了哪些自动配置?
Spring Boot provides auto-configuration for Spring MVC that works well with most applications.
The auto-configuration adds the following features on top of Spring’s defaults:
- Inclusion of ContentNegotiatingViewResolver and BeanNameViewResolver beans.
- Support for serving static resources, including support for WebJars.
- Automatic registration of Converter, GenericConverter, and Formatter beans.
- Support for HttpMessageConverters.
- Automatic registration of MessageCodesResolver.
- Static index.html support.
- Automatic use of a ConfigurableWebBindingInitializer bean.
如何新增自定义的配置?
If you want to keep those Spring Boot MVC customizations and make more MVC customizations(interceptors, formatters, view controllers, and other features), you can add your own
@Configurationclass of typeWebMvcConfigurerbut without@EnableWebMvc.If you want to provide custom instances of RequestMappingHandlerMapping,
RequestMappingHandlerAdapter, or ExceptionHandlerExceptionResolver, and still keep the Spring Boot MVC customizations, you can declare a bean of type WebMvcRegistrations and use it to provide 99 custom instances of those components.
如何屏蔽自动配置?
If you want to take complete control of Spring MVC, you can add your own
@Configurationannotated with@EnableWebMvc, or alternatively add your own @Configuration-annotated DelegatingWebMvcConfiguration as described in the Javadoc of @EnableWebMvc.
配置类上添加 @EnableWebMvc 注解,以屏蔽自动配置,仅使用自己的配置。
静态资源问题
- webjars: 以 jar 包的方式在 pom 中引入静态资源,这种方式下静态资源会被映射到
META-INF/resources/webjars/目录下。
# 这样访问静态资源
http://localhost/项目path/webjars/xxx- 普通方式: 下面路径都会映射到
/**,即直接在根路径/项目path/xxx下访问静态资源。
classpath:/META‐INF/resources/
classpath:/resources/
classpath:/static/
classpath:/public
默认请求 xxx 时,会先经过 DispacherServlet,找不到映射后,转发给 DefaultServlet 处理,即如果 Controller 和静态资源请求路径相同,Controller 将处理相应请求而不是静态资源。
可以使用 spring.mvc.static-path-pattern 指定静态资源的请求路径模式;
可以使用 spring.mvc.resources.static-location 改变默认静态资源目录。(过时)
spring:
  mvc:
    static-path-pattern: /resources/**
  resources:
    static-location:
- classpath:/abc这样请求路径就变成了:/项目path/resources/xxx。
拦截器
编写 HandlerInterceptor,实现方法:
@Slf4j
public class MyInterceptor implements HandlerInterceptor {
    @Override
    public boolean preHandle(HttpServletRequest request, HttpServletResponse response, Object handler) throws Exception {
        log.info("preHandle......");
        return true;
    }

    @Override
    public void postHandle(HttpServletRequest request, HttpServletResponse response, Object handler, ModelAndView modelAndView) throws Exception {
        log.info("postHandle......");
    }

    @Override
    public void afterCompletion(HttpServletRequest request, HttpServletResponse response, Object handler, Exception ex) throws Exception {
        log.info("afterCompletion......");
    }
}
注册到容器:
@Configuration
public class WebMvcConfig implements WebMvcConfigurer {
    @Override
    public void addInterceptors(InterceptorRegistry registry) {
        registry.addInterceptor(new MyInterceptor())
                // 拦截所有请求
                .addPathPatterns("/**")
                // 放行静态资源
                .excludePathPatterns("/css/**", "/js/**", "/images/**");
    }
}- 过滤器:由 Servlet 容器管理,在
DispatcherServlet之前执行,能够对所有进入容器的请求进行拦截。 - 拦截器:由 Spring MVC 管理,在
DispatcherServlet分发请求后执行,仅对 Spring MVC 的请求有效。
文件上传
@PostMapping("/upload")
public String upload(@RequestParam String name,
                     @RequestPart Person person,
                     @RequestPart MultipartFile file,
                     @RequestPart List<MultipartFile> fileList
) {
    log.info(name);
    log.info(person.toString());
    log.info(String.valueOf(file.isEmpty()));
    log.info(String.valueOf(fileList.isEmpty()));
    return "success";
}
@RequestParam 只能解析简单类型,如要要绑定 Json 需要使用 @RequestPart,且前端的表单数据要指定 content-type 为 application/json,如下图所示:
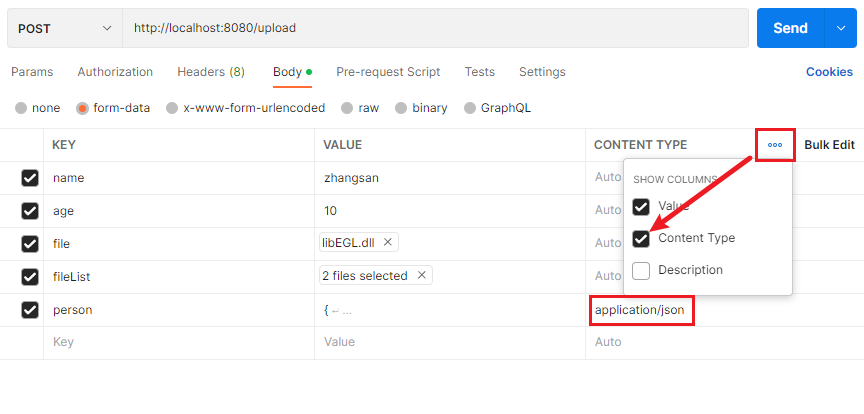
相当于前端 FormData.append() 方法中指定了 person 参数为 application/json 格式。
流式上传并计算 MD5
核心是配置 resolve-lazily 为 true,不要提前解析数据封装文件对象,而是进入 Controller 后使用时再处理,并且接口中不要自动绑定请求体参数,即不要使用 @RequestParam/Body 注解,可以将参数放在请求头、路径变量上,避免提前解析请求体。
servlet:
  multipart:
    max-file-size: 1GB
    max-request-size: 1GB
    resolve-lazily: true
/**
* 输入流,读取的同时计算输入流的 MD5
*/
@Data
public class HashingInputStream extends InputStream {
private final InputStream source;
private final MessageDigest digest;
public HashingInputStream(InputStream source, MessageDigest digest) {
this.source = source;
this.digest = digest;
}
@Override
public int read() throws IOException {
int data = source.read();
if (data != -1) {
digest.update((byte) data);
}
return data;
}
@Override
public int read(byte[] buffer, int offset, int length) throws IOException {
int bytesRead = source.read(buffer, offset, length);
if (bytesRead != -1) {
digest.update(buffer, offset, bytesRead);
}
return bytesRead;
}
@Override
public void close() throws IOException {
source.close();
}
public static String bytesToHex(byte[] bytes) {
StringBuilder hexString = new StringBuilder();
for (byte b : bytes) {
String hex = Integer.toHexString(0xff & b);
if (hex.length() == 1) hexString.append('0');
hexString.append(hex);
}
return hexString.toString();
}
}
@PostMapping("upload1/{a}")
public ResultBody post(HttpServletRequest request, @PathVariable(required = false) String a) throws IOException, FileUploadException, ServletException, NoSuchAlgorithmException {
ServletFileUpload upload = new ServletFileUpload();
upload.setHeaderEncoding(request.getCharacterEncoding());
if (ServletFileUpload.isMultipartContent(request)) {
InputStream inputStream;
long contentLength = request.getContentLengthLong();
FileItemIterator itemIterator = upload.getItemIterator(request);
if (itemIterator.hasNext()) {
FileItemStream next = itemIterator.next();
FileItemHeaders headers = next.getHeaders();
inputStream = next.openStream();
HashingInputStream md5 = new HashingInputStream(inputStream, MessageDigest.getInstance("MD5"));
int read = 0;
while (read != -1) {
read = md5.read();
}
String s = HashingInputStream.bytesToHex(md5.getDigest().digest());
return ResultBody.success(s);
} else {
//当没有配置懒加载时调用
Part file = request.getPart("file");
inputStream = file.getInputStream();
}
}
return ResultBody.success();
}统一异常处理
@RestControllerAdvice
@Slf4j
public class GlobalExceptionHandler {
    @ExceptionHandler(value = Exception.class)
    public String handleDefaultException(HttpServletRequest req, Exception e) throws Exception {
        log.error(e.getLocalizedMessage(), e);
        return "出错了!";
    }
}
切换嵌入式容器
<dependency>
    <groupId>org.springframework.boot</groupId>
    <artifactId>spring-boot-starter-web</artifactId>
    <exclusions>
        <!-- 排除 tomcat 启动器 -->
        <exclusion>
            <groupId>org.springframework.boot</groupId>
            <artifactId>spring-boot-starter-tomcat</artifactId>
        </exclusion>
    </exclusions>
</dependency>

<!-- 引入 undertow 启动器-->
<dependency>
    <groupId>org.springframework.boot</groupId>
    <artifactId>spring-boot-starter-undertow</artifactId>
</dependency>
其他
Actuator
Production-ready Features (spring.io)
添加依赖:
<dependency>
    <groupId>org.springframework.boot</groupId>
    <artifactId>spring-boot-starter-actuator</artifactId>
</dependency>
使用 management.endpoint.<id>.enabled 开启/关闭相关 端点 (Endpoint),默认开启了除 shutdown 外的所有端点。
# 开启 shutdown 端点
management:
  endpoint:
    shutdown:
      enabled: true
# 关闭所有,仅开启 info 端点
management:
  endpoints:
    enabled-by-default: false
  endpoint:
    info:
      enabled: true
默认只有 health 端点支持 http 方式访问。
# 控制 jmx 方式暴露,默认暴露所有
management.endpoints.jmx.exposure.exclude=xxx
management.endpoints.jmx.exposure.include=*
# 控制 http 方式暴露,默认暴露 health
management.endpoints.web.exposure.exclude=xxx
management.endpoints.web.exposure.include=health
yml 方式中 * 要加引号:
management:
  endpoints:
    web:
      exposure:
include: "*"请求方式:http://localhost:8080/actuator/health/
Swagger2
-
引入依赖:
<dependency> <groupId>io.springfox</groupId> <artifactId>springfox-boot-starter</artifactId> <version>3.0.0</version> </dependency> -
配置类:
@Configuration @EnableSwagger2 @ComponentScan(basePackages = "site.henrykang.controller") public class Swagger2SpringBoot { private ApiInfo apiInfo() { return new ApiInfoBuilder() .title("xxAPI文档") .description("这里是描述……") .version("1.0.0") .build(); } @Bean public Docket xxApi() { return new Docket(DocumentationType.SWAGGER_2) .enable(true) .apiInfo(apiInfo()) .groupName("xx模块") .select() .apis(RequestHandlerSelectors.basePackage("site.henrykang.controller.user")) .build(); } } -
Controller:
@Api(tags = "模块描述") @Xxx public class XxxController { @ApiOperation("方法描述") @PostMapping public Result postSth( @ApiParam("参数描述") Param param1, @ApiParam("参数描述") Param param2, @ApiParam("参数描述") Param param3 ) { } } -
Bean:
@ApiModel
public class Bean {

    @ApiModelProperty(value = "描述", position = 1, hidden = true)
    private Long para1;

    @ApiModelProperty(value = "提问者ID", position = 2)
    private Long para2;
}
JSR-303
引入
-
引入依赖:
<dependency> <groupId>org.springframework.boot</groupId> <artifactId>spring-boot-starter-validation</artifactId> </dependency> -
使用
// 注意包
import javax.validation.constraints.NotBlank;

// 实体属性上加
@NotNull		// 验证对象是否非Null
@NotBlank		// 验证String是否为空、
@NotEmpty		// 验证容器是否为空
@Pattern		// 验证自定义正则表达式
@AssertTrue		// 验证Boolean
@Min			// 验证数值或String类型
@Max
@Size			// 验证容器或String的长度范围
@Past			// 验证时间戳是否在当前时间之前
@Future
@Email			// 验证是否邮箱格式
……

// 接口上需要验证的参数前加
@Valid 或 @Validated
// eg
@PostMapping("/post")
@ApiOperation("post操作")
public People post(
        @ApiParam("people") @Valid @RequestBody People people,
        BindingResult bindingResult // 这个参数封装了校验结果
) {
    if (bindingResult.hasErrors()) {
        bindingResult.getFieldErrors().forEach((item) -> {
            log.info(item.getField() + item.getDefaultMessage());
        });
    }

    return people;
}
分组校验
目的是给一个属性加上多种校验规则,在不同的条件下,使用不同的规则。例如自增的 ID 属性,插入时需要为 NULL,修改时需要为 NotNull。
-
发现这些个校验注解都有一个分组的属性,且是一个数组
Class<?>[] groups() default {}; -
创建标记接口
public interface AddGroup {} public interface UpdateGroup {} -
加注解时传入指定的标记
@NotNull(message = "Update时要非空ID",groups = {UpdateGroup.class}) @Null(message = "Add时要空ID",groups = {AddGroup.class}) @ApiModelProperty(value = "id", position = 0, hidden = true) private String id; -
在期望校验的地方也要传入标记
@ApiParam("people") @Validated({AddGroup.class}) @RequestBody People people -
问题:发现 Bean 中其他没添加分组的属性,都不会被校验。
// 解决:让我们的标记接口继承 Default 接口
// javax.validation.groups.Default

public interface AddGroup extends Default {}
public interface UpdateGroup extends Default {}

// 分组特别多的话,为了统一写成内部接口也行,就是注解稍微长点
public interface XxxGroup{
    interface AddGroup extends Default{};
    interface UpdateGroup extends Default{};
}
统一处理
// 不需要在每个接口后面接收BindingResult参数了
@RestControllerAdvice(basePackages = "site.henrykang.controller")
public class GlobalExceptionControllerAdvice {

    @ExceptionHandler(value= MethodArgumentNotValidException.class)
    public R handleValidException(Exception e){
        MethodArgumentNotValidException ex = null;
        if (e instanceof MethodArgumentNotValidException) {
            ex = (MethodArgumentNotValidException) e;
        }
        BindingResult bindingResult = ex.getBindingResult();
        Map<String,Object> map = new HashMap<>();
        bindingResult.getFieldErrors().forEach((item)->
                map.put(item.getField(),item.getDefaultMessage())
        );
        return R.error().setCode(400).setMessage("参数异常").setData(map);
    }
}
非 Object 属性的校验
例如想对 get 请求的某个参数进行校验。
-
在相应 Controller 上添加@Validated;
-
再在参数前使用相应注解即可。
-
会抛出
javax.validation.ConstraintViolationException异常。 -
统一异常处理
@ExceptionHandler(ConstraintViolationException.class)
    public R handleValidationException(ConstraintViolationException e){
        Map<String, Object> map = new HashMap<>();
        Set<ConstraintViolation<?>> constraintViolations = e.getConstraintViolations();
        constraintViolations.forEach((item) -> {
            map.put(String.valueOf(item.getPropertyPath()), item.getMessage());
        });
        return R.error().setCode(400).setMessage("参数异常").setData(map);
    }
SpringBoot 扩展点
应用生命周期相关
SpringApplicationRunListener
监听 SpringBoot 应用的整个生命周期,例如启动前、环境准备、上下文刷新、应用就绪等。需要实现 SpringApplicationRunListener 接口,并在 META-INF/spring.factories 中注册。
public class MyRunListener implements SpringApplicationRunListener {
    public MyRunListener(SpringApplication application, String[] args) {
        // 构造函数
    }

    @Override
    public void starting() {
        System.out.println("应用启动前");
    }

    @Override
    public void environmentPrepared(ConfigurableEnvironment environment) {
        // 环境准备完成
    }

    // 其他生命周期方法
}
在 META-INF/spring.factories 中注册:
org.springframework.boot.SpringApplicationRunListener=\
com.example.MyRunListener
ApplicationListener
可以监听所有 ApplicationEvent 事件,如 RefreshEvent、SpringApplicationEvent、ApplicationContextEvent 等。
注册监听器时继承 ApplicationListener 接口,并注入容器即可:
@Component
public class MyEventListener implements ApplicationListener<ApplicationEvent> {

    @Override
    public void onApplicationEvent(ApplicationEvent event) {
        // 处理事件...
    }
}
ApplicationRunner & CommandLineRunner
在应用启动完成后执行自定义逻辑 (仅执行一次),如数据初始化、预热。实现 ApplicationRunner 或 CommandLineRunner 接口即可,可定义多个并通过 @Order 注解指定执行顺序。
@Component
public class MyStartupRunner implements ApplicationRunner {
    @Override
    public void run(ApplicationArguments args) throws Exception {
        System.out.println("应用启动完成,执行初始化...");
    }
}
Bean 生命周期相关
InitializingBean & DisposableBean
在 Bean 初始化完成后或销毁前执行特定操作。
@Component
public class MyService implements InitializingBean, DisposableBean {
    @Override
    public void afterPropertiesSet() throws Exception {
        System.out.println("Bean 初始化完成");
    }

    @Override
    public void destroy() throws Exception {
        System.out.println("Bean 销毁前");
    }
}
BeanFactoryPostProcessor
在 Bean 定义加载后、实例化前修改 Bean 定义。
@Component
public class MyBeanFactoryPostProcessor implements BeanFactoryPostProcessor {
    @Override
    public void postProcessBeanFactory(ConfigurableListableBeanFactory beanFactory) throws BeansException {
        BeanDefinition bd = beanFactory.getBeanDefinition("myService");
        bd.setScope(BeanDefinition.SCOPE_PROTOTYPE);
    }
}
BeanPostProcessor
在 Bean 初始化前后进行增强(如创建代理)。
@Component
public class MyBeanPostProcessor implements BeanPostProcessor {
    @Override
    public Object postProcessBeforeInitialization(Object bean, String beanName) throws BeansException {
        if (bean instanceof MyService) {
            System.out.println("Before initialization: " + beanName);
        }
        return bean;
    }

    @Override
    public Object postProcessAfterInitialization(Object bean, String beanName) throws BeansException {
        if (bean instanceof MyService) {
            System.out.println("After initialization: " + beanName);
        }
        return bean;
    }
}
配置相关
EnableAutoConfiguration
用于自定义自动配置类,可以实现条件化加载。
@Configuration
@ConditionalOnClass(MyService.class)
@ConditionalOnMissingBean(MyService.class)
public class MyAutoConfiguration {
    @Bean
    public MyService myService() {
        return new MyServiceImpl();
    }
}
在 META-INF/spring.factories 中注册:
org.springframework.boot.autoconfigure.EnableAutoConfiguration=\
com.example.MyAutoConfiguration
EnvironmentPostProcessor
用于在 Spring 环境 (Environment) 加载完成后修改配置属性,配置中心的加载就在此阶段加载。
public class MyEnvironmentPostProcessor implements EnvironmentPostProcessor {
    @Override
    public void postProcessEnvironment(ConfigurableEnvironment environment, SpringApplication application) {
        // 添加自定义配置源
        environment.getPropertySources().addFirst(new MyPropertySource());
    }
}org.springframework.boot.env.EnvironmentPostProcessor=\
com.example.MyEnvironmentPostProcessor